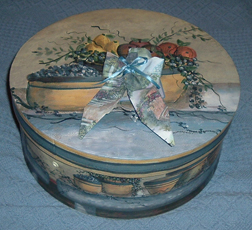
The lid on this particular hat box came with a label printed into the design, so I made a bow out of some matching leftover wallpaper and glued it over the label.
When my beloved cat Remington Steele was still alive, he delighted in absconding with necklace chains so he could bat them under furniture and large appliances. I was forced to resort to jewelry boxes that could not be easily opened by prying paws. While the sturdy cases solved the problem, the one atop the bureau didn’t blend with the style of my bedroom. I tried not to care.
Then, at our office Christmas party last year, I received a matching stationery collection. The note cards, notepad, address book, and photo album were useful, the delicious candy a nice touch. But what really excited me was the container they were displayed in. It resembled a Victorian hat box, with style and colors exactly that matched my bedroom décor. I temporarily removed the jewelry box from the bureau and set the hat box in its place. Very classy!
However the last thing I needed was an empty dust-catcher. And where would I put the jewelry it displaced? I couldn’t simply dump it all into the box. Or could I? Since the Savage Sisters thrive on creative problem solving, a plan began to form in my mind about how to create dividers to turn the novelty cardboard container into a full-fledged jewelry box.

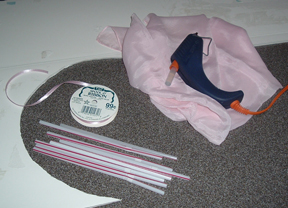
I used supplies I already had on hand: drinking straws, leftover fabric, old foam board, ribbon, etc.
The purpose of this post isn’t so you can do exactly the same thing should you happen to fall heir to a stationery/hat box someday. Our desire is to inspire you to take things you already own and repurpose them into useful items you’ll treasure.
But just in case you want step-by-step directions for this particular project, here they are:
Gather tools and supplies:
- Decorative hat box
- Foam board
- Plastic or flexible wood strip for edging, as wide as you need to protect your thickest piece of jewelry from the shelf above it (I cut 5/8-inch strips from a thin plastic material I found in the garage. I have no idea what it was intended for, but it makes great jewelry-box edging.)
- Plastic drinking straws
- Fabric that won’t easily ravel
- Glue gun and glue sticks
- Industrial/craft adhesive, such as E-6000 Craft Adhesive
- Diluted white glue (about 50 percent water)
- Heavy-duty straight pins
- Narrow ribbon
- Buttons
- Small, take-out condiment cups, such as the kind salsa comes in at my favorite Mexican restaurant

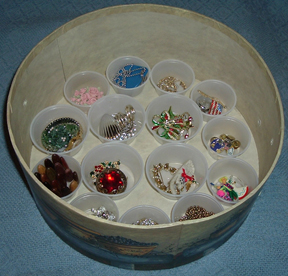
On the bottom layer of the box, I set little condiment cups to hold items used only occasionally--my Christmas pins, for instance. The 3 shelves will stack on top of this layer.
- Cutting tool, such as a box cutter or scissors
Make shelves for the jewelry box:
- Carefully measure the inside diameter of the box.
- Draw a circle with that diameter on a piece of foam board. I used foam that had once served as a tri-fold display at conferences. One trick to drawing a perfect circle is to tack a length of string to the center of the foam, tie a pen or pencil to the string at a point equal to half the diameter of your desired circle, and gently swing the pen around at the end of the string tether. Hold the tack with one hand and the pen exactly upright with the other, drawing on the foam board as you move, always keeping the string taut. You should now have a perfect circle indicating where to cut.
- Cut out the circle with a box cutter or pair of sharp scissors. Dry-fit the circle to the box interior, shaving off any excess for a generous fit. Be sure to leave room for fabric that you’ll be gluing around the edge. If the circle has changed from your original computation, use the new circle as a template for the other shelves. After guesstimating how much headroom each layer of jewelry will need, determine the number of circle-shelves you want, and cut the rest of them out of the foam board.
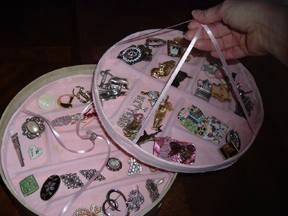
- Lay drinking straws on each circle so they form shallow dividers, and hot-glue them into place. I used a different configuration on each circle. Snip the straws to size if they’re too long.
- Cut out fabric circles a little larger than the size of the foam circles. Brush diluted white glue over the foam and the drinking straws, and lay the fabric circle over everything, smoothing the fabric as best you can. Leave a quarter of an inch bare around the edge of the circle. Fold the fabric back on itself toward the center of the circle, keeping the edge exposed for the next step. Hold the fabric out of the way with straight pins.

A button sewn at the cross point keeps the ribbons from tangling and makes them easy to grasp when lifting a shelf out of the box.
- Wrap a strip of the 5/8-inch edging around the circumference of the foam circle to measure exactly how much you’ll need, and trim off any excess length. Working your way around the top of the circle’s edge, lay down a bead of E-6000 adhesive, and immediately set the edge of the plastic or wood strip upright into the adhesive as you go along. This forms a little “wall” around the circle. Every couple of inches, anchor the little wall with heavy-duty straight pins to hold it in place until the adhesive dries.
- When the craft adhesive is set and the little wall is firmly in place, remove all the pins, and brush the inside and outside of the wall with diluted white glue. Unfold the fabric from where you bunched it in the middle, and drape it over the wall, smoothing it down carefully on the inside and outside surfaces. Tuck the edge of the fabric under the circle, and glue it to the underside. The fabric will need to be gathered somewhat evenly in this process. Your shelf is almost done.
- If having plain foam on the underside doesn’t bother you, skip to step 9. If it does bother you, turn the shelf over and cut out a fabric circle slightly smaller than the shelf’s circumference. Brush the bottom of the shelf with diluted glue and lay the fabric circle over the bottom, covering the raw edges of the gathered fabric that came over the little wall from the other side. If you wish, you can cut slits in the gathered fabric to allow pieces to overlap and lie more smoothly under the new fabric circle covering the bottom.
- Take the narrow ribbon and pin one end to the bottom center of the shelf. Bring it up over the top of the shelf and back down on the other side to the bottom center again, leaving enough slack so you’ll to be able to hold the new “handle” about 6 inches above the top surface of the shelf. Repeat at right angles with another piece of ribbon, equal in length to the first. Stitch the ends together and anchor them to the fabric beneath (or the foam beneath, if you opted not to cover it with fabric).
- Making sure the shelf is right-side up, hold the two lengths of ribbon at the midpoint as they arc over the topside of the shelf, and stitch a small button at the cross point.
- Fill the layers with jewelry, and set the shelves in the box. Voila!
“Very clever,” I can hear some of you saying. “But I don’t need a jewelry box.”
Ah, remember, our intent is to help you think of creative ways to repurpose your own stuff. The satisfaction of ending up with something useful while reducing landfill trash is worth even more than the money you’ll save.
The old jewelry box? I think I’ll offer it to someone on Freecycle.org now that the new one is both utilitarian and beautiful. I know it would have kept Remington from swiping my necklaces, and because it looks like a simple hat box, it might also foil a true cat burglar — not that any of the costume jewelry inside is worth stealing. I’m sure all of the really valuable pieces are still under the dryer.
Written by Fiercely Frugal Savage Sister Diana
© 2009, The Savage Sisters

Hiding your valuable jewelry under the dryer? Now that’s really being frugal! What a smart cat.
This is a clever way to use those decorative boxes I can’t resist but don’t know what to do with.